
Campervan Project #3: Versatile Lagun Table
The Lagun table mount system is used in many RV’s and campervan conversions that we’ve seen online. We love its ability to be adjusted vertically and horizontally. However, the system requires a mounting bracket to be attached to something vertically. The challenge is to find a good surface to mount to in our VanDOit van. Our creative solution attempts to take advantage of the bench seat mounting points that exist in the floor of our van.

Our main goal for the table was to provide enough of a work surface for one person to work on a laptop comfortably while seated at the third row bench seat. Additional goals were to provide enough room for two people to work or eat sitting down, double as an extra cooking prep space at counter height, and also be a work surface while standing and using the TV as a large monitor.

The Lagun table mount system comes with one mounting bracket, the adjustable table leg and arm, and the mounting plate to attach the table top. The table top is not included. So our project includes making the table top and figuring out a base post system for the mounting bracket which is secured somehow by the mounting point in the van floor. Since we wanted to be able to test out and live with the table for awhile to see if we need to make any changes to our design, we decided this project would be a working prototype. Therefore, we made the base and table top out of birch plywood. While we call this a prototype, we feel the top is less likely to undergo changes, but we think the base certainly could once we have the opportunity to test it in place.

The basic design was to build a base unit to mount into the floor and a table top that was 24” by 18” with an extension on each side measuring 12” by 18”, thus doubling the work surface when extended. The table top extensions would be attached to the main table top using hinges so that they would fold on top of the main top when not in use.

We started with the base. A 2x6 was mounted to a 15 inch square piece of plywood using a hinge. The hinge will allow the base unit to lay flat and store easier. A J Hook Type Toggle Clamp (paid link) was attached to the 2x6 and a hole was cut into the base plywood to allow the hook to drop into the floor. Since we don’t have the van yet to test it out, we rigged up a work bench with a rod. However, we struggled with getting the clamp to lock into place. Eventually it worked when we made sure the rod we were clamping to stayed directly below the clamp. Hopefully everything will work as well in the van. We don't yet know how far the clamp will need to reach below floor level so we expect that will need adjusting.

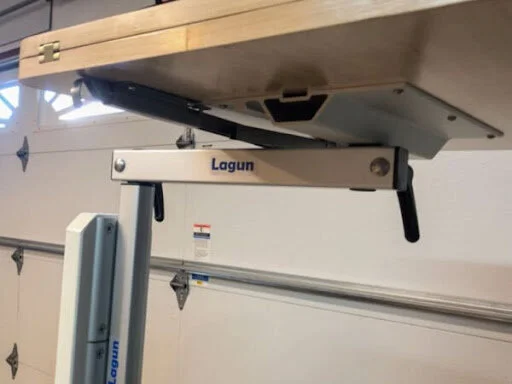
Initially we mounted just one Lagun wall mounting bracket to the 2x6 post. However, due to the limited range of motion, we could only get two of the three desired heights for the table (sitting desk, kitchen prep, standing desk). Therefore, we decided to mount two brackets onto the post. Luckily we had ordered an extra mounting bracket in case we wanted a second mounting point in the van. However, it was a little tricky getting the two brackets to line up so the vertical support leg would slide through both of the brackets smoothly and easily, especially since we were trying to reuse two of the holes in the post made when mounting just the one bracket.

Moving on to the table top, we cut the three pieces out of a single 2 foot by 4 foot sheet of plywood so that the wood grain would line up. We rounded all the corners, not only for looks, but also to prevent bumping into sharp corners in such close quarters. To dress it up even more, we applied birch banding around the edges. The three pieces were connected together using Solid Brass Hinges (OwnMy Solid Brass Hinge - paid link) used for butler trays or sewing table leaves. Several coats of acrylic polyurethane completed the table top before mounting it to the Lagun mounting plate.

At this point, we realized that the table extensions needed more support when the table top was open; the two hinges on each side were not enough. Left Buddy (LB) found some Metal Drop Leaf Supports (paid link) on Amazon. Ideally LB wanted to center the supports, front to back, under the main table top, but the Lagun mounting plate was in the way. So LB opted to offset the supports to one side of the mounting plate.

So now we are just anxiously waiting to test out our table in our van. It should mount in any of the floor mounts, allowing use of the table from the bench seat or passenger seat, and extending a good portion of the width of the van for a wonderful cooking surface. We’ll post an update once we pick up our van this week so you can see the table in action.
Check out the video of the Versatile Lagun Table Build on our YouTube Channel. Please subscribe so you don’t miss any of our campervan project posts.
(RB)